Popular

Template Information

Welcome To Sora Films

Browsing "Older Posts"

PC ကို USB နဲ႔ Lock/ Unlock လုပ္နည္း

/

ကြန္ပ်ဴတာကို USB နဲ႔ Lock ခ်လို႔ရသလို ျပန္ျဖဳတ္လို႔လည္းရပါတယ္..

လုပ္နည္း
၁။ အရင္ဆံုး Control Panel ဝင္လိုက္ပါ ၿပီးရင္ ညာဘက္က အေပၚမွာ Category မွာ ကလစ္ၿပီး Large icons ကို ကလစ္လိုက္ပါ
၂။ BitLocker Drive Encryption ကိုရွာပါ ေတြ႕ရင္ ကလစ္လိုက္ပါ
၃။ ကိုေလာ့ခ်င္တဲ့ Disk Drives ကိုေရြးၿပီး Turn on bitLocker ကို ကလစ္လိုက္ပါ
၄။ ေပၚလာမယ့္ ဝင္းဒိုးမွာ Use a password to unlock the drive ကို အမွတ္ျခစ္ေပးလိုက္ပါ
၅။ Type your password: နဲ႔ Retype your password: မွာ password ကိုျဖည့္ေပးလိုက္ပါ ႏွစ္ခုလံုး အတူတူျဖည့္ေပရမွာ ျဖစ္ပါတယ္ ဆိုလိုတာက (Type your password: မွာ 123456 ဆိုရင္ Retype your password: မွာ 123456) အဲ့လိုျဖည့္ေပရမွာျဖစ္ပါတယ္ password ကေတာ့ ကိုမွတ္ရလြယ္တဲ့ password ျဖည့္လိုက္ပါ ႀကိဳက္တာျဖည့္ႏိုင္ပါတယ္ မေမ့ဖို႔လိုပါတယ္ ေမ့ေနရင္ေတာ့ ......? သိတယ္ေနာ္
၆။ ၿပီးရင္ Next ကိုကလစ္ပါ ၿပီးရင္ Save the recovery key to a file ကို ကလစ္လိုက္ပါ
၇။ Text Files ေလးကို ႀကိဳက္တဲ့ေနရာမွာ သိမ္းလိုက္ပါ Save ကိုကလစ္ပါ ၿပီးရင္ Next ကိုကလစ္ပါ
၈။ ေပၚလာမယ့္ ဝင္းဒိုးမွာ Start Encrypting ကိုကလစ္လိုက္ပါ Encrypting လုပ္ေနတာေတြ႕ရပါလိမ့္မယ္
Encrypting လုပ္ေနတာၿပီးေအာင္ေစာင့္လိုက္ပါ ၿပီးရင္ေတာ့ အိုေကၿပီေပါ့ စမ္းၾကည့္လိုက္ပါ။


ကၽြန္ေတာ္ ႀကိဳၿပီးေတာ့ Unlock Drive ေသာ့ျပန္ျဖဳတ္တဲ့ နည္းပါေရးေပးလိုက္ပါတယ္ ဘာျဖစ္လို႔လဲဆိုေတာ့ သိတဲ့အတိုင္းေပါ့ Lock ခ်တဲ့နည္းေျပာၿပီးရင္ Unlock ျပန္ၿပီးျဖဳတ္တဲ့ နည္းေလး ျပန္ေမးလာမွာ ေသခ်ာလို႔ပါ ဒါေၾကာင့္ တစ္ခါတည္း ေရးေပးလိုက္ပါတယ္ ျဖဳတ္ခ်င္တဲ့ Usb ကိုထိုးလိုက္ပါ ၿပီးရင္ ေအာက္ကအတိုင္း လိုက္လုပ္ပါ။

၁။ Control Panel ျပန္ဝင္လိုက္ပါ ၿပီးရင္ ညာဘက္က အေပၚမွာ Category မွာ ကလစ္ၿပီး
၂။ Large icons ကို ကလစ္လိုက္ပါ ၿပီးရင္ BitLocker Drive Encryption ကိုရွာပါ ေတြ႕ရင္ ကလစ္လိုက္ပါ
၃။ ေလာ့ျပန္ျဖဳတ္ခ်င္တဲ့ Disk Drives ကိုေရြးၿပီး Unlock Drive ကို ကလစ္လိုက္ပါ
၄။ ေပၚလာမည့္ဝင္းဒိုးမွာ ကိုေပးထားတဲ့ password ျပန္ျဖည့္ၿပီး Unlock ကိုကလစ္လိုက္ပါ
၅။ ၿပီးရင္ ခုဏကေနရာမွာ Turn Off BitLocker ကိုကလစ္လိုက္ပါ Turn Off BitLocker ဆိုတဲ့ ဝင္းဒိုးေပၚလာပါမယ္ အဲ့မွာ Decrypt Drive ကိုကလစ္လိုက္ပါ Dectypting လုပ္ေနတာကို ၿပီးေအာင္ ေစာင့္လိုက္ပါ။

အကယ္၍ Usb ထိုးလိုက္ၿပီး (Auto Run သို႔မဟုတ္ My Computer) ကေနဝင္ၿပီး ေသာ့ဖြင့္ခဲ့မယ္ဆိုရင္ အေပၚက (၃။) နဲ႔ (၄။) အတိုင္း လိုက္လုပ္စရာ မလိုေတာ့ပါဘူး တခါတည္း (၅။) ကအတိုင္းလုပ္လိုက္ပါ ကဲဗ်ာ ဒီေလာက္ဆို လံုေလာက္ၿပီလို႔ ကၽြန္ေတာ္ထင္ပါတယ္ ေသခ်ာဖတ္ၿပီး လုပ္ၾကည့္ပါ အဆင္ေျပမယ္လို႔ထင္ပါတယ္။

CD/DVD Drive ေတြကို Lock ခ်ေပးမယ့္ CD DVD Door Guard Pro v3.3 Full

/
မိမိကြန္ပ်ဴတာရဲ႕ CD. DVD Drive ေတြကို Lock ခ်ေပးပါတယ္.. ဒီေဆာ့၀ဲကို Install လုပ္ၿပီး Run လိုက္ရင္ Task Bar ရဲ႕ ညာဘက္ Tray ထဲမွာ သူ႕ Icon ေလးေရာက္လာပါတယ္.. အဲဒီ Icon ကို Right Click ေထာက္လိုက္ရင္ ေအာက္က ပံုလို က်လာပါမယ္..

အဲဒီထဲက ကို Lock ခ်လိုတဲ့ Drive Name ကို ေရြးေပးလိုက္ရံုနဲ႔ Drive ကို Eject ခလုတ္ကေန ဖြင့္လို႔ မရေတာ့ပါဘူး..
ပံုထဲကလိုပဲ. Open Drive , Close Drive ကိုႏွိပ္မွ ရမွာပါ...
ပံုေလးၾကည့္ရံုနဲ႔ သံုးတတ္မွာပါ.. လြယ္ပါတယ္..

...make CD/DVD Door Guard Pro protect CD-ROM? CD/DVD Door Guard Pro is designed to protect your CD-ROM and other optical drives. So, usually there is no need making any additional efforts - protection begins when CD/DVD Door Guard Pro is installed. You can change some options to make the protection more effective.

...open or close CD-ROM's door using mouse only?
Look at CD/DVD Door Guard Pro's icon (it is placed it tray bar, next to the clock). Click on it with any mouse button and choose "Open" or "Close". Then choose the letter of the drive you want to open or close - that's all!

...turn on/off automatic loading of CD/DVD Door Guard Pro? Click on CD/DVD Door Guard Pro's icon, choose "Options". Check "Start automatically" box if you want to turn automatic loading on or either uncheck it.

...lock or unlock CD-ROM?
Look at CD/DVD Door Guard Pro's icon (it is placed it tray bar, next to the clock). Click on it with any mouse button and choose "Lock" or "Unlock" respectively. Then choose letter of drive you want to lock or unlock.

...register CD/DVD Door Guard Pro?

You can find information here.

...get registration without paying any money? It is possible to save your money and get registration of CD/DVD Door Guard Pro at the same time. There are three ways to do it:
1.Translate interface of CD/DVD Door Guard Pro into your native language;  
2.Translate this help file into your native language;  
3.Translate our site into your native language. 


Windows 8 နဲ႔ Compitable ျဖစ္တယ္ဆိုတဲ့ Deep Freeze Enterprise 7.60.220.4298

/


Deep Freeze ေတာင္းဆိုေနတဲ့သူမ်ားအတြက္ Deep Freeze Enterprise 7.60.220.4298 ကိုတင္ေပးလိုက္ပါတယ္.. ဒီဗားရွင္းက Windows 8 နဲ႔ အဆင္ေျပတယ္လို႔ ဒီေဆာ့၀ဲကို ထုတ္လုပ္တဲ့ Faronics ရဲ Website မွာ ေရးထားပါတယ္.. ဒီမွာ အျပည့္အစံုကိုဖတ္ႏိုင္ပါတယ္.. ေအာက္မွာ ေဒါင္းဖို႔တင္ေပးလိုက္ပါၿပီ

Faronics Deep Freeze Enterprise makes PCs indestructible. It protects endpoints by Freezing the desired configuration set by you – the IT professional. Any unwelcome or unwanted changes users make while in-session are prevented from sticking. It’s really simple. By restarting your computers, systems are returned to the desired state. Meanwhile, user data can be stored safely on a network drive or in a ThawSpace to be retained across reboots. This helps machines run smoothly and efficiently, while giving you more up-time and boosting user productivity. The built-in Deep Freeze Enterprise Console or Core Console makes life even easier.
Deep Freeze’s central management capabilities allow you to enjoy the benefits of customizing, deploying, and managing Deep Freeze on your endpoints from one central location. Need to manage Windows Updates? Simply download them while Frozen and they’re automatically applied when machines are Thawed. Once the process is finished, machines are automatically returned to their Frozen state.
Since Deep Freeze ensures 100% workstation recovery with every restart, you can watch that mountain of support tickets shrink. Customers report an average reduction of 63%. You can also forget about accidental configuration changes, malicious software, and operating system degradation. Now you and your IT staff can get more sleep, worry less, and maybe even leave the office on time once in a while.

အဆင္ေျပၾကပါေစ...


Setup Download Links: 19.2 MB

Keymaker Download Links: 64.5 KB

Windows 8 တြင္ Zawgyi-One Font အသုံးျပဳနည္း

/

Windows 8 အသုံးျပဳသူမ်ားအတြက္ Zawgyi-One Font အသုံးျပဳနည္းေလး ေျပာျပပါ့မယ္။ အရင္ဆုံးကြ်န္ေတာ္ေအာက္မွာေပးထားတဲ႔ Link ေလးေတြကေန Zawgyi Font ကုိေဒါင္းေလာ႔ခ်လုိက္ပါ။ ျပီးရင္  Winrar ဖုိ္္င္ေလးကိုျဖည္လုိက္ပါ။ ပထမဖုိင္လ္ထဲမွာ  Setup ဆုိတာေလးကို အရင္ Install လုပ္ပါ။ ျပီးရင္ ဒုတိယဖုိင္ထဲက IEZawGyiGtalkfont ဆုိတာကို install လုပ္ပါ။ ဒါဆုိရင္ပထမ အဆင္႔ျပီးပါျပီ။ 
ဒုတိယအဆင့္က Control Panel ထဲဝင္ျပီး Language Setting ကုိျပင္ဖုိ႔လုိပါတယ္။ 
ဆင့္(၁) Control Panel ကုိသြားဖုိ႔ကရုိးရုိးေလးပါပဲ။ Desktop ေပၚကုိ Right Click ေထာက္ Personalize ကုိကလစ္ေပးပါ။  ညာဘက္ထိပ္မွာ Control Panel Home ဆုိတာကို ကလစ္ေပးပါ။  Windows 8 ျဖစ္တဲ႔အတြက္ Language ဆုိျပီးကမာၻလုံးပုံေလးကို ကလစ္ေပးပါ။
 

အဆင့္(၂) အဲဒီမွာ Advaced Settings ဆုိတာကို လကစ္ေပးပါ။ 

အဆင့္(၃) Override for default input method  ဆုိတာကုိရွာ၊ အဲဒီေအာက္က ဘားေလးထဲမွာ English(United States)- Zawgyi Myanmar Unicode L  ဆုိတာေလးကုိ ေရြးေပးပါ။  ဒါဆုိရင္ Zawgyi  Font ကုိ windows 8 မွာ အသုံးျပဳလုိ႔ရပါျပီ။


Gtalk Setting တြင္ ျမန္မာစာေျပာင္းေသာ္လည္း ျမန္မာစာမေပၚျခင္းျပႆနာ

/
Gtalk Setting မွာ ျမန္မာစာလည္း ေျပာင္းၿပီးသြားၿပီ.. ဒါေပမယ့္ Gtalk မွာ စာရိုက္တဲ့အခါ တံုးေလးေတြပဲေပၚတယ္.. Enter ေခါက္လိုက္ရင္ေတာ့ ျမန္မာစာက ေပၚျပန္ေရာဗ်ာ.. ဒီျပႆနာကို ဘယ္လိုေျဖရွင္းရမလဲ.. ဒါက Windows 7 မွာ အျဖစ္မ်ားတတ္ပါတယ္..


1.Start ထဲက Control Panel ကုိႏွိပ္ပါ..
2.Control Panel ေဘာက္ထဲမွာ Network and Internet ကိုႏွိပ္ပါ..


3.ေပၚလာတဲ့စာမ်က္ႏွာမွာ ညာဘက္ျခမ္းက Internet Option ကိုႏွိပ္ပါ..


4.Internet Option Box ထဲမွာ Fonts ဆိုတဲ့ Button ေလးကို ထပ္ႏွိပ္ပါ.


5.ေပၚလာတဲ့ေဘာက္ကေလးထဲက ဘယ္ဘက္ျခမ္းေလးမွာ Zawgyi One ကိုေရြးၿပီး OK ႏွိပ္ပါ.. 


ဒီအဆင့္က Control Panel ထဲက Network Setting ကိုခ်ိန္ညွိလို႔ၿပီးပါၿပီ..
ေနာက္ထပ္ Gtalk Setting ကို ထပ္ခ်ိန္ရပါအံုးမယ္..
1.Gtalk ကိုဖြင့္ပါ..
2.Setting ကိုႏွိပ္ပါ..


3.Gtalk Setting ကိုေရာက္သြားရင္ Fonts ကိုႏွိပ္ၿပီး Zawgyi One ကိုႏွိပ္ၿပီး OK လုပ္ပါ..


Google Chrome မွာ ျမန္မာစာေပၚေအာင္ လုပ္မယ္

/


                ဒါေလးကေတာ႔ Google Chrome မွာ ျမန္မာစာေပၚေအာင္လုပ္နည္းေလးပါ


1.Google Chorme ကိုဖြင့္ၿပီးရင္ ညာဘက္အေပၚေထာင့္နားေလးမွာ ရွိတဲ့ Setting ကိုႏွိပ္ပါ


2.က်လာတဲ့ Drop Down menu ထဲမွာ Setting ကို ထပ္ႏွိပ္ပါအံုး
3.အဲဒါဆိုရင္ Setting ဆိုတဲ့ေခါင္းစဥ္ေအာက္မွာ
   Sign in
   On start up
   Apperance စတဲ့ေခါင္းစဥ္ခြဲေတြေတြ႕ရမွာပါ။
   အဲဒီထဲက Web content ဆိုတဲ့ေခါင္းစဥ္ကို ရွာပါ။ တကယ္လို႔မ်ားမေတြ႔ေသးရင္  Show Advanced Setting ဆိုတာကို ႏွိပ္လိုက္ပါ။

4.Web content ဆိုတဲ့ေခါင္းစဥ္ရဲ႕ ေအာက္မွာ Customize Fonts ဆိုတဲ့ Tab ကိုႏွိပ္လိုက္ပါ


5.ေပၚလာတဲ့ေဘာက္မွာ ရွိတဲ့ Font အားလံုးကို Zawgyi-One ေျပာင္းပစ္လိုက္ေပါ့

6.ၿပီးရင္ Scroll ကိုဆြဲၿပီး ေအာက္နားမွာ Encoding ဆိုတာရွိတယ္။ အဲဒါမွာ Unicode(UTF-8) ကိုေျပာင္းလိုက္ပါ။


7.ေဇာ္ဂ်ီေျပာင္းၿပီးၿပီဆိုရင္ ေတာ့ OK ႏွိပ္လိုက္ပါ

ဒါဆိုရင္ Google Chrome Browser မွာ ျမန္မာစာနဲ႔ေရးတဲ့ ဘေလာ့၊ ၀က္ဘ္ဆိုဒ္ မ်ားကို ေကာင္းစြာ
ဖတ္ႏိုင္ၿပီျဖစ္ေၾကာင္းပါခင္ဗ်ာ.....

အဆင္ေျပပါေစ....

Google Chrome Brower မွာ Default Language ကို English နဲ႔ျမင္ရေအာင္လုပ္နည္း

/

Google Chrome မွာ Setting ထဲ၀င္လိုက္ရင္ English လိုမဟုတ္ဘဲ  Использовать веб-службу для проверки правописания လို စာမ်ဳိးေတြေပၚတယ္လို႔ မိတ္ေဆြ တစ္ေယာက္က ေျပာလာပါတယ္.. ဒါက Chrome Setting ရဲ႕ Language and Spelling Checker မွာ English (US) မဟုတ္ဘဲ အျခား Language တစ္ခုခု ျဖစ္ေနလို႔ပါ.. ဒီေတာ့ Setting ထဲကို ၀င္ျပင္ဖို႔က Language ဆိုတဲ့ ေခါင္းစဥ္ေအာက္ကို သြားရမွာျဖစ္ပါတယ္..
လုပ္နည္းၾကည့္ရေအာင္..
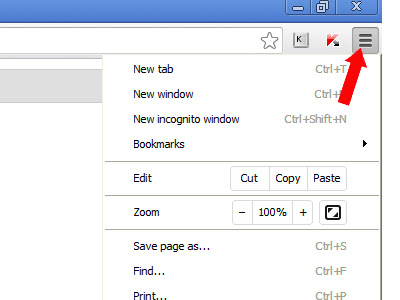
1. Google Chrome Address Bar ရဲ႕ ညာဘက္ဆံုးက မ်ဥ္းတို(၃)ေခ်ာင္း အၿပိဳင္ျဖစ္ေနတာကို တစ္ခ်က္ႏွိပ္လိုက္ရင္ Drop Down Menu က်လာပါမယ္.. Setting ကိုႏွိပ္ပါ.. Setting ဆိုတဲ့ စာေတာင္ အဂၤလိပ္စာမဟုတ္ရင္ Drop Down Menu ရဲ႕ 14 ခုေျမာက္ List ကိုႏွိပ္လိုက္ပါ..


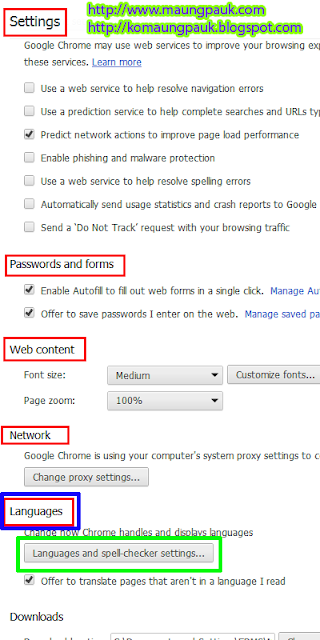
2. ေပၚလာတဲ့ Setting အကြက္မွာ Language ဆိုတဲ့ ေခါင္းစဥ္က အဂၤလိပ္လို ေပၚမွာေတာ့ မဟုတ္ပါဘူး.. ဒီေတာ့ အေပၚဆံုး ေဘးေခါင္းစဥ္ေလး ကေန ေရၾကည့္လိုက္ရင္ 12 ခုေျမာက္ဟာ Language ဆိုတဲ့ ေခါင္းစဥ္ျဖစ္ပါတယ္.. အဲဒီေအာက္နားေလးမွာ ကပ္လ်က္က Language and Spelling Checker Setting ျဖစ္ပါတယ္.. ဒါကိုႏွိပ္ရမွာပါ.. ေအာက္ကပံုမွာ အနီနဲ႔ျပထားတဲ့ Setting ဆိုတဲ့ေခါင္းစဥ္ေလးပါ ထည့္ေရရင္ 12 ေခါင္းစဥ္ေျမာက္ဟာ Language ေခါင္းစဥ္ပါ.. အနီ၊အျပာ နဲ႔ ျပထားပါတယ္.. အဲဒါရဲ႕ ေအာက္က အစိမ္းနဲ႔ျပထားတဲ့ ဟာက Language and Spelling Checker Setting ျဖစ္ပါတယ္. အဲဒါကို ႏွိပ္ပါ..

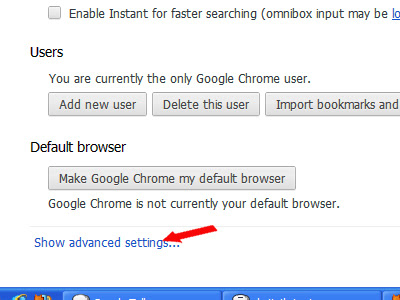
(==> တကယ္လို႔မ်ား ေခါင္းစဥ္ေတြအားလံုးမေပၚခဲ့ရင္ Show Advanced Setting ကိုႏွိပ္ရမွ ေခါင္းစဥ္အားလံုးေပၚမွာပါ.. အဲဒါလည္း အဂၤလိပ္စာမေပၚခဲ့ရင္ အျပာေရာင္ စာေလးနဲ႔ေပၚပါလိမ့္မယ္.. ရွာၿပီးႏွိပ္လိုက္ပါ.. 7 ခုေျမာက္ ေခါင္းစဥ္ရဲ႕ ေအာက္မွာျဖစ္ႏိုင္ပါတယ္.. )


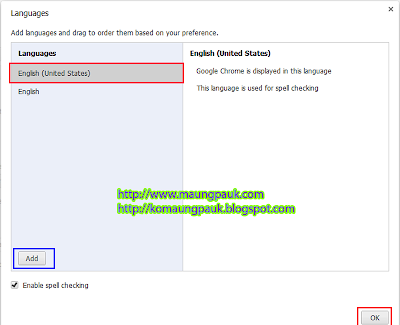
3. အခု Language and Spelling Checker Setting ထဲမွာ Language ကို English ( United State ) ကိုေရြးၿပီး OK ကိုႏွိပ္ေပးရမွာျဖစ္ပါတယ္.. တကယ္လို႔ အဲဒီအကြက္ထဲမွာ English ( United State ) ကို မေတြ႕ရင္ Add ကိုတစ္ခ်က္ႏွိပ္လိုက္ၿပီး ထပ္ေပၚလာတဲ့ေဘာက္ေလးမွာ English (United State ) ကို ေရြးၿပီး OK ကိုႏွိပ္လိုက္ပါ.. ဒါဆိုရင္ Setting မွာ အဂၤလိပ္လို ေခါင္းစဥ္ေတြအျပင္ အဂၤလိပ္စာနဲ႔ရွိေနရမယ့္ ေနရာတိုင္းမွာ အဂၤလိပ္လိုပဲ ေပၚမွာျဖစ္ပါတယ္..

µTorrent 3.2 Build 27886 Full

/


µTorrent ဗားရွင္းအသစ္ထြက္လာလို႔တင္ေပးလိုက္ပါတယ္... µTorrent မွာ တင္ထားတာေတြကို µTorrent နဲ႔ပဲေဒါင္းလို႔ရပါတယ္. ဖိုင္ဆိုဒ္ႀကီးႀကီးေတြကို µTorrent နဲ႕ပဲ တင္ထားၾကတာေတြ႕မိၾကပါလိမ့္မယ္.
Features:

• Multiple simultaneous downloads
• Smart bandwidth usage
• File level priorities
• Configurable bandwidth scheduling
• Global and per-torrent speed limiting
• Quickly resumes interrupted transfers
• UPnP support (WinXP only)
• Supports popular protocol extensions
• Trackerless support (Mainline DHT)
• Localized to different languages
• Typical memory use less than 6 MB
• Incredibly small: about 900 KB

µTorrent Patch:
'uTorrent Patch' can Increase Your speed.

~ Install Notes ~
Step 1: Install uTorrent.exe
အဆင့္၁. utorrent.exe ကို Install လုပ္ပါ.
Step 2: When Finish Installation, Close Program.
အဆင့္(၂) Install လုပ္ၿပီးသြားရင္ Program ကိုပိတ္ပါ..
Step 3: Exit uTorrent From Taskbar.
အဆင့္(၃) Taskbar ရဲ႕ညာဘက္မွာရွိတဲ့ uTorrent ကို Right Click ေထာက္ၿပီး exit ကိုႏွိပ္ပါ..
Step 4: Now Run "Patch.exe" Then Apply Patch.
အဆင့္(၄). Patch.exe ကို Run ၿပီး Apply Patch ကိုႏွိပ္ပါ...
Step 5: Done, Enjoy Increase Speed.
အဆင့္(၅).. ၿပီးဆံုးသြားၿပီျဖစ္ပါတယ္...

Download Links: 0.81 MB

EYE4SOFTWARE GPS MAPPING V5.0.12.1214

/

EYE4SOFTWARE GPS MAPPING က လက္ရွိ Update GPS ေျမပံုေတြကိုေဖၚျပေပးမွာျဖစ္ၿပီး Geo သမားေတြ၊ Survey သမားေတြ၊ ေျမပံုနဲ႔အလုပ္လုပ္ေနရာသူေတြ အဆင္ေျပပါမွာပါ...

Feature :
Add comments, symbols, tracks, waypoints or routes to your maps;
Transfer GPS data like tracks, waypoints and routes, from or to your Garmin GPS device;
View GIS features of vector data;
View maps containing elevation or depth data;
Edit waypoints, tracks and routes;
Show your current position on a map;
Convert GPS data between different file formats;
Convert vector maps to AutoCAD DXF, Keyhole Markup Language, ESRI Shape, GeoRSS,
GeoJSON, ARC Generate or Atlas BNA format;
Convert vector maps from one map projection to another.
Perform realtime positioning on vessels, cars, trucks and construction vehicles;
Record your current position and movements, for instance to get hold of the covered area or track.
Load previously recorded track-and-trace data for further analysis
And many more..

Setup Download Links: 18 MB

Crack Download Links:

WinRar 5.00 Beta 1 Full Version (x86/x64)

/


WinRar 5.00 Beta 1 ထြက္လာလို႔တင္ေပးလိုက္ပါတယ္... ဒီ ေဆာ့ဖ္၀ဲက ကြန္ပ်ဴတာကိုင္သူတိုင္း မျဖစ္မေန ေဆာင္ထားရမယ့္ ေဆာ့ဖ္ဝဲျဖစ္ပါတယ္... ဖိုင္ေတြကို 8% ကေန 13 % ထိ ခ်ဳံ႕ေပးႏိုင္ပါတယ္... ဖိုင္ေတြကို Zip, Rar ဖိုင္ေတြအျဖစ္ Compress လုပ္ေပးႏိုင္ၿပီး CAB, ARJ, LZH, TAR, GZ, ACE, UUE, BZ2, JAR, ISO, 7Z, Z ဖိုင္အမ်ဳိးအစားေတြကို ျဖည္ထုတ္ေပးႏိုင္ပါတယ္...

Features of WinRAR 5.00 Beta 1
Using WinRAR puts you ahead of the crowd when it comes to compression by consistently making smaller archives than the competition, saving disk space and transmission costs.
WinRAR provides complete support for RAR and ZIP archives and is able to unpack CAB, ARJ, LZH, TAR, GZ, ACE, UUE, BZ2, JAR, ISO, 7Z, Z archives.
WinRAR offers a graphic interactive interface utilizing mouse and menus as well as the command line interface.
WinRAR is easier to use than many other archivers with the inclusion of a special “Wizard” mode which allows instant access to the basic archiving functions through a simple question and answer procedure. This avoids confusion in the early stages of use.
WinRAR offers you the benefit of industry strength archive encryption using AES (Advanced Encryption Standard) with a key of 128 bits.
WinRAR supports files and archives up to 8,589 billion gigabytes in size. The number of archived files is, for all practical purposes, unlimited.
WinRAR offers the ability to create selfextracting and multivolume archives.
Recovery record and recovery volumes allow to reconstruct even physically damaged archives.
WinRAR features are constantly being developed to keep WinRAR ahead of the pack.

အဆင္ေျပပါေစ...

ေမာင္ေပါက္

Setup Download For 32bit :

Setup Download For 64bit:

Keygen Download Links:

How to Convert Bat to Exe

/

  ကၽြန္ေတာ္တို႔ Windows မွာ ေရးထားတဲ့ batch file (.bat) ေတြကို executable file (.exe) file ကိုေျပာင္းေပးတဲ့ software တစ္ခုျဖစ္ပါတယ္။ Software ကို password ထားလို႔ရတာအျပင္ တျခား function ေတြလည္းပါပါတယ္။ .bat file က code ေတြကို သူမ်ားေတြလြယ္လြယ္ကူကူၾကည့္ႏိုင္ၿပီး .exe file က code ေတြကေတာ့ၾကည့္ရန္ခက္ခဲတဲ့ အတြက္ exe file type ကိုေျပာင္းၾကတာျဖစ္ပါတယ္။


 1) Download Bat To Exe Converter (f2ko)
                    Bat To Exe Converte
2) Extract it using Winrar
3) Run Bat_To_Exe_Converter.exe 

4) Click the first browsing button "..." and select the Batch (.bat) file.
5) Click the second browsing button "..." and select where to save your Exe file.
6) Customize your Application by adding some options:
Visibility : On/Off
Encryption
Icon (and many others)

Done! Now run your converted Exe file

Iron Man 3 v1.0 for iPhone/Pad/Pod touch

/

၂၀၁၃ ဧျပီလ ၂၄ ရက္ေန႕မွာေတာ့ Iron Man 3 ဂိမ္းထြက္ရွိလာပါျပီ။ Iron Man 3 ဂိမ္းကုိနာမည္ေက်ာ္ Mobile Game ကုမၸဏီတစ္ခုျဖစ္တဲ့ Gameloft ကဖန္တီးထားျခင္းျဖစ္ပါတယ္ ။ Iron Man 3 ဂိမ္းကုိ Iron Man 3 ရုပ္ရွင္ဇာတ္ကား ၊ ဇာတ္ညႊန္းႏွင့္ မူရင္းရုပ္ျပစာအုပ္မွ ဇာတ္လမ္းသြားမ်ားကုိအေျခခံ၍ Iron Man 3 ဂိမ္းအသစ္ကုိေရးဆြဲထားတယ္လုိ႕ဆုိပါတယ္။ ဒီဂိမ္းမွာေတာ့ Iron Man ဇာတ္ေကာင္တစ္ခုတည္းမဟုတ္ဘဲ Iron Man ရဲ႕အေဖာ္အျဖစ္ အျခား Iron Man ၀တ္စုံသုံးခုျဖင့္ေျပာင္းလဲကစားနုိင္မွာျဖစ္သလို လက္နက္မ်ားကုိလည္း upgrade ျမွင့္တပ္ဆင္နုိင္မွာျဖစ္ျပီး အရင္တုန္းကထြက္ရွိထားတဲ့ Iron Man ဂိမ္းမ်ားနဲ႕မတူတဲ့အခ်က္က ဒီဂိမ္းမွာ Iron Man ဇာတ္ေကာင္က Endless Runner အေနနဲ႕ကစားရမွာျဖစ္ပါတယ္။ Iron Man 3 v1.0 for iPhone/Pad/Pod touch ကို iTunes Store မွာ download ရယူနုိင္ျပီး Jailbreak လုပ္ထားတဲ့ iPhone/Pad/Pod touch ေတြအတြက္ေအာက္က link မွာ download ရယူနုိင္ပါတယ္။

Download Here:


Mirror link: Iron Man 3 v1.0 for iPhone/Pad/Pod touch အားရယူရန္